Monday, November 30, 2015

Instant Mudakathan Keerai Dosa | Balloon Vine leaves Crepe

Instant Mudakathan  Keerai Dosa | Balloon Vine leaves Crepe is a healthy dosa made by mixing idli batter with mudakathan keerai puree. Mudakathan keerai is well known for its medicinal properties in healing bone related deseases. The traditional recipe of mudakathan keerai dosa is different from this instant recipe. I’ll share that one also in future.

Now we go for this Instant  Mudakathan Dosa recipe...
 Recipe for Instant Mudakathan  Keerai Dosa | Balloon Vine leaves Crepe:
                          Cuisine : Indian| South Indian
Category: Breakfast|Dinner
Preparation time : 10 Minutes
Cooking time : 20 Minutes
yields –10 dosas (medium size) 
Ingredients:
  • Fermented Idli batter – 2 cup
  • Mudakathan keerai - 1 cup
  • Water – as required
  • Sesame oil | Nallennei – as required

Method:
  1. Clean mudakathan keerai, pluck only the leaves & wash  in enough water for about 3 times.
  2. Drain the leaves and grind to a fine paste in a mixer grinder. Transfer it to a container.
  3. Add the fermented  batter to the same container & combine everything very well. Add water, if required, to make  a dosa batter consistency.
  4. To prepare dosa, heat a iron|non-stick dosa pan.
  5. Mix the batter well with a ladle. Take a ladleful of batter and pour on the hot dosa pan and spread the batter in circular pattern.
  6. Drizzle some oil over the dosa, cover with a lid and cook in medium flame.
  7. After 2 minutes, open the lid, check for the doneness and transfer the dosa on to a serving plate.

Healthy, tasty, colourful Instant Mudakathan  Keerai Dosa is ready to eat. You can serve this keerai dosa with any chutney of your choice. 
Note:
  • Idli batter quantity may be varied as per your choice.
  • It is not advisable to store dosa batter in the refrigerator after mixing mudakathan keerai paste. So, use the idli batter accordingly to finish the batter immediately.


Tags: Mudakathan keerai Dosa recipe, Balloon Vine leaves Crepe, Mudakathan keerai dosa recipe, South Indian breakfast ideas, Healthy Breakfast recipe, Healthy Breakfast ideas, Healthy greens recipes, Diabetic friendly recipes, Dosa varieties, Herbal dosa batter using Balloon Vine leaves, South Indian breakfast using medicinal greens, Health benefits of Balloon Vine leaves, Medicinal greens recipes

Read more ...

Friday, October 30, 2015

Kathirikkai Kothsu | Brinjal Gothsu | Easy Brinjal Gothsu Recipe

Kathirikkai Kothsu | Brinjal Gothsu is a South Indian side dish | dip using eggplants|brinjals as a main ingredient to serve as a side dish for idli, dosa, pongal, etc. I like this gothsu with hot steaming idlies or with sponge dosas rather than with any other stuff. The recipe is quite simple; I made it simpler by using  pressure cooker. I prefer to prepare this “ÖPOS” brinjal kothsu  with  fresh, tender brinjals. I’ve used Vellore brinjals in this recipe which are soft, tender & fleshy.

Here we go for the recipe.
Recipe for Kathirikkai Kothsu | Brinjal Gothsu | Easy Gothsu Recipe:
Cuisine : Indian| South Indian
Category: Side Dish
Preparation time :5 Minutes
Cooking time : 15 Minutes
Serves  – 2
Ingredients:
  • Brinjal (cut into small cubes) – 1 cup
  • Onion (finely chopped) – 1 No.
  • Green chilli (slitted) – 1 No.
  • Tomatoes (finely chopped) – ½  - ¾ cup
  • Sambar powder – 1 tsp
  • Turmeric powder – ½ tsp
  • Salt to taste

For seasoning:
  • Oil – 1 tbsp
  • Mustard – 1 tsp
  • Jeera|Cumin seeds – 1 tsp
  • Curry leaves - few

Method:
  1. Wash brinjals and cut into small cubes. Transfer to a bowl with water.
  2. In a pressure cooker, heat oil and season with the items given “For seasoning”.
  3. Add green chilli and sauté for a minute.
  4. Add the finely chopped onion and sauté till it becomes translucent.
  5. Add the tomatoes and sauté till they become mushy.
  6. Add the brinjal and sauté  until the skin colour changes.
  7. Add the masala powders and mix everything well.
  8. Add the required salt and a cup of water.
  9. Close the lid and pressure cook for 4 whistles in simmer.
  10. Open the lid once the pressure subsides and mash the contents with a wooden masher.
  11. Transfer to a serving bowl.

Spicy, creamy kathirikai kothsu is ready to enjoy with hot steaming idlies.
Note:
  • Always use fresh, fleshy brinjals to get creamy gotsu.
  • If you prefer more tanginess in the dish, tamarind juice can be added at the end.
  • Mash the kothsu when it is hot.
  • I like to mash the kotsu coarse like the way shown in the pic.

Tags: Kathirikkai kothsu recipe, Brinjal kothsu recipe, Brinjal Gothsu recipe, Velur kathirikaai recipe, Velur Mullu kathirikkai recipe, How to prepare kathirkai kothsu in pressure cooker?,  OPOS brinjal kothsu, Easy brinjal kothsu recipe, side dish for idli, side dish for dosa, side dish for Ven Pongal, Side dish for kolukattai
Read more ...

Thursday, October 29, 2015

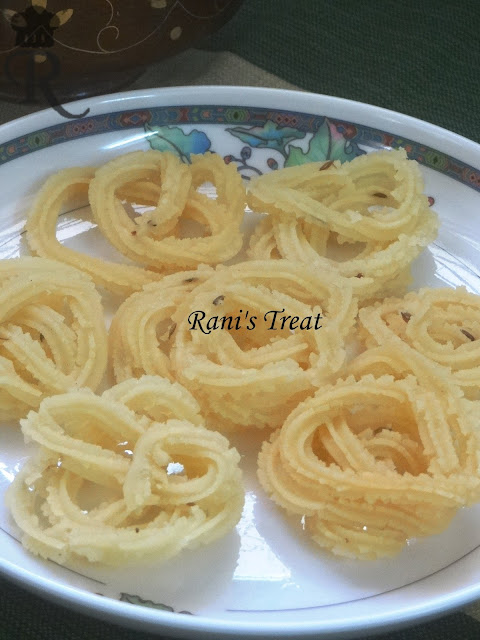
Instant Murukku|Chakli using Idiyappam Flour| Easy Diwali Recipes

Murukku | Chakli is a traditional Indian snack made during festivals like Diwali, Krishna Jayanthi,etc I’m sure everyone has  nostalgic memories related to Deepavali sweets & savouries and one among them is murukku. Now-a-days, we too try to replicate things for festivals like our moms but it is very difficult to do everything from scratch as our moms & grand moms did those days. Ofcourse lot of readymade flours available to help us in this fast world. I don’t dare to buy those to do experiments. But readymade idiyappam flour is the one which I keep stock always for preparing idiyappam for our dinner. Once  I tried the murukkus  with idiyappam flour and they were so light, crisp & soft. From then on, I tried so many times with different brands & every time it came out well. It is a fool proof recipe, even the beginners can try without any fear.
Let us move on to the recipe!

Recipe for Murukku|Chakli using Idiyappam Flour| Easy Diwali Recipes:

Cuisine : Indian| South Indian
Category: Snack
Preparation time : 10 Minutes
Cooking time : 25 Minutes
yields  – 12-15 (medium size)
Ingredients:
  • Idiyappam Flour – 1 cup
  • Roasted gram dhal| Pottukadalai powder – ¼ cup
  • Butter (at room temperature) – 1 tsp
  • White sesame seeds  or Jeera – 1 tbsp
  • Salt  to taste
  • Oil – for frying
  • Water – as needed
Method:
  1. Heat 2 cups of water in a sauce pan.
  2. Dry muruku press with star hole and a flat laddle .Grease both with little oil and keep ready.
  3. In the mean time, heat oil in a broad kadai.
  4. Sieve idiyappam flour and transfer it into a mixing bowl.
  5. Powder pottukadalai in a mixer and sieve. Measure ¼ cup powder and add it to the idiyappam flour. Add salt and jeera|sesame seeds and mix everything well.
  6. Add butter and mix well with your hands. Then add hot water little by little and knead into a soft dough.
  7. Divide the dough into equal cylinders and place one in the murukku press. Squeeze the dough on the back of the greased ladle in circular pattern.
  8. Gently slide this into the hot oil and wait for 2 minutes.
  9. When you see the murukku becomes firm in texture, transfer it to the other side and cook till the oil sound stops. Take out and keep on the paper towel.
  10. Store in an air tight container once they completely cool.
Soft & crispy murukku is ready for Diwali!
Note:
  • Don’t add roasted gram dhal powder more than the quantity mentioned.
  • These murukkus tend to drink oil as we are adding hot water in the recipe. Keeping the chaklis on paper towel for sometime helps in draining the extra oil.
  • Don’t trun the murukkus as soon as you drop in the oil because that will make the murukku to break.
  • I’ve tried chaklis with these brands-“Priyam & Double Horse idiyappam flour”.
  • You can add chilli powder, asafoetida as per your choice.
Tags: Murukku recipe, Easy Chakli recipe, Deepavali recipes, easy Diwali Recipes, Murukku with idiyappam flour,  Deepavali Savory recipes, Easy snack recipes,  How to prepare murukku using idiyappam flour?, Murukku with idiyappam flour & pottukadalai powder
Read more ...

Monday, September 14, 2015

Pillayarpatti Modhakam | Karaikudi Mothagam| Vinayaka Chathurthi Recipes

Pillayarpatti Modhakam | Mothagam is a steamed sweet rice dumpling prepared as Prasadam in Vinayakar temples, especially in Pillayarpatti. Pillayarpatti is famous for the rock cut temple and Karpaga Vinayakar is the main deity there. 
In Karaikudi, we call these sweetened  balls as modhakam but most of the people refer Poorana Kolukattai aka Stuffed sweet dumplings as modhakam. Whatever it may be, Pillayar likes all varieties of kolukattais; so we can prepare both plain & stuffed kolukattais for forth coming Vinayaka Chathurthi festival.
I’ve already posted the recipe for Thengai Poorana Kozhukattai, Spicy Pidi Kolukattai & Karupatti pidi kozhukattai & White Channa Sundal as Ganesh Chathurthi Special recipes.You can check out the recipes Here.

Here we go for the Pillayarpatti Modhakam recipe!
Recipe for Pillayarpatti Modhakam | Karaikudi Mothagam| Vinayaka Chathurthi Recipes:
                          Cuisine : Indian| South Indian
Category: Prasadham|Snack
Preparation time : 1 Hour
Cooking time : 25 Minutes
Serves  – 4
Ingredients:
Raw rice – 1 cup
Moong dhal – ¼ cup
Jaggery (crushed) – ¾  cup
Coconut gratings – ¼ cup
Cardamom powder – 1 tsp
Ghee – 1 tbsp
Water – 2 ½ + ½  cups
Method:
  1. Wash raw rice in water and spread on a cotton cloth till the moisture in the rice leaves out completely.
  2. Grind the raw rice into coarse rava & keep aside.
  3. Dry fry moong dhal in simmer till you get nice aroma & allow to cool.
  4. Grind moong dhal also into coarse rava & keep aside.
  5. Melt the powdered jaggery in ½  cup of water and strain the impurities, if any.
  6. Add 2 ½   cups of water in a heavy bottomed kadai & bring it to boil.
  7. Bring the flame to simmer and add both  rava by stirring continuously without forming any lumps.
  8. Close the lid and cook for 10 minutes by stirring now & then.
  9. When the rava is done, add the melted jaggery and mix everything well.
  10. When the dough rolls into thick mass, add ghee, coconut gratings & cardamom powder. Mix everything well.
  11. Switch off & allow to cool.
  12. Grease your hands with ghee, make lemon sized balls and steam for 10 minutes.

Tasty Modhakam is ready for offering to Lord Ganesh!
Note:
  • Rice should be ground to rava consistency.
  • Water quantity may vary depending on the quality of rice.
  • Store bought rice rava can also be used.
  • Don’t steam modhakam for more time as it will harden the balls.

Tags: Modhakam recipe, Pilayarpatti Modhak recipe, Vinayaka chathurthi recipes, Ganesh Chathurthi recipes, Easy kozhukattai recipes, Pillayarpatti Prasadham recipes, Sweet kolukattai recipe, How to make modhakam with rice rava?, How to make Pillayarpatti mothakam?, Easy modhakam recipe
Read more ...

Friday, September 11, 2015

Pirandai Thogaiyal | Pirandai Chutney| Healthy Chutney Recipes

Pirandai Thogaiyal | Pirandai Chutney is a healthy chutney made with pirandai. Pirandai is a creeper which has amazing health benefits. Pirandai in Tamil is known as Adamant Creeper, Veldt Grape, Devil’s Backbone in English.  This herb is excellent in treating digestion problems. That is why,  tradition is being followed in South Indian Brahmin families to include this thogayal as a “Must-to-do” recipe during some specific occasions on which they make an elaborate menu. It is rich in calcium and hence it is good for treating bone related problems.

Now-a-days, pirandai is available in local markets. You can choose tender pirandai and try out this recipe.
Recipe for Pirandai Thogaiyal | Pirandai Chutney| Healthy Chutney Recipes:
                          Cuisine : Indian| South Indian
Category: Chutney| Dip
Preparation time : 10 Minutes
Cooking time : 10 Minutes
Serves  – 4

Ingredients:
  • Pirandai (chopped) – ½ cup
  • Mustard – 1 tsp
  • Urad dhal – 1 tbsp
  • Bengal gram dhal – 1 tbsp
  • Red chillies – 5 Nos.
  • Asafoetida – ½ tsp
  • Tamarind – small gooseberry size
  • Coconut gratings – 2 tbsp
  • Gingelly oil – 2 tbsp
  • Salt to tsate.
Method:
  1. Wash pirandai very well in running water, break near the joints, peel the hard outer veins and chop into small pieces. Keep aside.
  2. In a kadai, add  1tsp oil and when it is hot, add mustard. Then add urad dhal & Bengal gram dhal and saute till dhals turn golden brown. Add red chillies & asafoetida and  saute until they become crisp. Transfer it to a plate.
  3. In the same kadai, add the balance oil. To this add the pirandai pieces and sauté in simmer for 3-5 minutes till pirandai pieces got shrunk in size. Switch off.
  4. Transfer all to a mixie jar. To this add tamarind, coconut gratings & salt and grind coarsely by adding little water.
Healthy, tasty Pirandai chutney is ready. You can have it with idli/dosa or curd rice. You can even mix with hot steaming rice.

Note:
  • While cleaning pirandai, apply oil on both of your hands to avoid itching. Else you can use hand gloves.
  • Don’t avoid adding tamarind in this recipe as it helps in suppressing the itchiness of pirandai.
  • Always choose tender pirandai.
  • If you like, you can season the chutney with mustard.
Tags: Pirandai chutney recipe,  Pirandai thuvaiyal, Thogayal recipes, Chutney recipes, South Indian chutney recipe using pirandai, pirandai recipes, Healthy chutney recipes, Herbal recipes, side dish for idli/dosa, side dish for rice

Read more ...

Thursday, September 3, 2015

Sweet Aval Puttu| Sweetened Poha

Sweet Aval Puttu| Sweetened Poha is a healthy, tasty sweet dish made using rice flakes as main ingredient. It is usually prepared as Neivedyam during Hindu festivals like Krishna Jayanthi, Navaratri, Aadi Velli, etc. The recipe is a simple one with minimum ingredients and even a newbie can make this as it doesn’t warrant much effort. 
I’m posting this recipe today as “Sri Krishna Jayanthi|Janmashtami” is going to be celebrated on 5th Sep, 2015. This festival is observed in remembrance of Lord Krishna’s birth. Krishna is fond of aval, butter and other snack items like murukku, seedai, etc. So it is mandatory to prepare the favourites for a birthday baby on this occasion.  I think we, Indian women love to celebrate this festival as we all see mischievous Lord Kanna in our children. Those who don’t have time to make all the traditional sweets|snacks can easily go for this recipe as it needs minimum time for preparation.

“Happy Gokulashtami to one & all”
Recipe for Sweet Aval Puttu| Sweetened Poha| Krishna Jayanthi Recipes:

Cuisine : Indian| South Indian
Category: Sweet|Prasad
Preparation time : 10 Minutes
Cooking time : 10 Minutes
Serves  – 4
Ingredients:
  • Thick aval (poha) – 1 cup
  • Milk – ½ cup
  • Jaggery (powdered) – ¾ cup
  • Coconut gratings – ½ cup
  • Cardamom Powder – 1 tsp
  • Ghee – 1 tsp
  • Cashews – few

Method:
  1. Dry fry aval in a heavy bottomed kadai and powder coarsely in a mixie.
  2. Transfer the powdered aval to a bowl, add milk and mix well. Keep aside for 10 minutes.
  3. In the mean time, melt jaggery with ¼ cup of water and strain the impurities.
  4. Heat the strained jaggery syrup so that it forms “Honey” consistency.
  5. Add coconut gratings to the jaggery syrup and mix well.
  6. After a minute, add the soaked poha & cardamom powder and mix everything well.
  7. Switch off , when the mixture forms a puttu consistency.
  8. Garnish puttu with ghee fried cashewnuts.

Krishna’s favourite aval puttu is ready for Neivedyam. 
Note:
  • The given measure of milk works out for thick poha. If you are using thin variety, just sprinkle little milk over the poha powder.
  • You can increase the quantity of jaggery to 1 cup


Tags: Sri Krishna Jayanthi Recipes, Janmashtami Recipes, Festival Recipes, Poha Recipes, How to prepare puttu with aval?, Sweetened aval puttu recipe, How to prepare puttu with thick  aval?, How to prepare puttu with thin poha?, Easy pooja recipes

Read more ...

Wednesday, September 2, 2015

Cauliflower Egg Burji| Cauliflower Egg Stir Fry| Cauliflower Muttai Poriyal

Cauliflower Egg Burji| Cauliflower Egg Stir Fry| Cauliflower Muttai Poriyal is a tasty side dish suitable for rice as well as rotis. Cauliflower & egg is a super combo and both taste delicious in this recipe. This tastes good with sambar, rasam and curd.
Here we go for the recipe...

Recipe for Cauliflower Egg Burji| Cauliflower Egg Stir Fry| Cauliflower Muttai Poriyal:

Cuisine : Indian| South Indian
Category: Side Dish
Preparation time : 10 Minutes
Cooking time : 15 Minutes

Serves  – 2-3
Ingredients:
  • Cauliflower Florets – 1 cup
  • Egg – 2 Nos
  • Ginger (finely chopped) – 1 tsp
  • Onion (finely chopped) – 1 No.
  • Green chilli (finely chopped) – 1 No.
  • Turmeric powder – ½ tsp
  • Pepper powder – 1 tsp
  • Coriander| cilantro (finely chopped) – 1 tbsp
  • Salt to taste
For seasoning:
  • Oil – 1 tbsp
  • Curry leaves - few

Method:
  1. Cut cauliflower into florets and soak in hot, salted water for 10 minutes.
  2. Wash the florets  in running water. Drain them from water & keep aside.
  3. In a kadai, heat oil and season with curry leaves.
  4. Add finely chopped ginger, onion & green chilli, one by one and sauté till onion becomes translucent.
  5. Add turmeric powder & mix everything. To this add the cauliflower florets & ½ of the salt required for the recipe and  mix very well. Sprinkle little water and cook the cauliflower covered for about 5 minutes.
  6. In the mean time, beat eggs with  salt required for egg alone and keep aside.
  7. When the cauliflower is ¾ th cooked, slide the cauliflower to the edge of the kadai and add the beaten egg in the centre. Allow to cook egg without disturbing for a while.
  8. When the egg is cooked,  just scramble the egg into pieces and mix with cauliflower.
  9. Add pepper powder, mix everything well and allow to cook for 2 minutes.
  10. Finally add coriander leaves and switch off.

Tasty cauliflower muttai poriyal is ready to enjoy with hot steamed rice!!

Note:
  • Don’t overcook  cauliflower.
  • Carefully add salt as we are adding it in different stages.

Tags: Cauliflower egg bhurjee recipe, Cauliflower stir fry with egg, scrambled cauliflower & egg recipes, cauliflower recipes, egg recipes, cauliflower muttai poriyal, gobi anda fry recipe, side dish recipes, Side dish for rice, Side dish with cauliflower, Side dish with egg, Side dish for roti, cauliflower stuffing for bread
Read more ...

Monday, August 10, 2015

Kuthiraivali Dosa | Banyard Millet Crepe | Millet Breakfast Recipe

Kuthiraivali Rice Dosa | Banyard Millet Crepe | Millet Dosa is a healthy, tasty South Indian special dosa using the short grain called kuthiraivali. It is prepared like our regular dosa except for using millet in the recipe in place of  idli rice|raw rice. One could not notice any difference in the taste or texture from the regular dosa but may be the colour shows the difference. That too all because I’ve used semi-polished rice in the recipe. There are also 100% polished millets available in the stores & in that case there will not be much colour difference too.
Recipe for Kuthiraivali Dosa | Banyard Millet Crepe | Millet Breakfast Recipe:

Cuisine : Indian| South Indian
Category: Breakfast|Dinner
Soaking time : 5 Hours
Preparation time : 30 Minutes + 8-12 Hours
Cooking time : 20 Minutes
                          Yields –12 dosas (medium size) 
Ingredients:
  • Kuthiraivali Rice| Banyard Millet – 1 ½ cup
  • Urad dhal - ½ cup
  • Fenugreek seeds|Vendhayam – 1 tsp
  • Water – as required
  • Salt to taste
  • Sesame oil | Nallennei – as required

Method:
  1. Wash kuthiraivali separately and urad dhal & vendhayam together. Soak them separate in enough water for about 5 hours.
  2. Drain urad dhal & vendhayam and pulse it in a mixer grinder. Add the soaked water little by little to make a fine, fluffy batter. Transfer it to a container.
  3. Add the drained kuthiraivali rice and grind to a fine batter using the soaked water. Transfer it to the same container.
  4. Add enough salt and combine both the batter very well. Add enough water to make like a dosa batter. Cover & allow to ferment for 8 hours or overnight.
  5. To prepare dosa, heat a iron|non-stick dosa pan.
  6. Mix the fermented batter well with a ladle and add water, if required, to bring it to dosa batter consistency.
  7. Take a ladleful of batter and pour on the hot dosa pan and spread the batter in circular pattern.
  8. Drizzle some oil over the dosa, cover with a lid and cook in medium flame.
  9. After 2 minutes, open the lid, check for the doneness and transfer the dosa on to a serving plate.

Healthy, tasty Kuthiraivalli dosa is ready to eat. You can serve this millet dosa with any chutney of your choice. I had it with coriander chutney. 

Note:
  • Instead of kuthiraivali, any other millet can be used with the same proportions.
  • Dosa batter stays good for 2-3 days in the refrigerator.


Tags: Kuthiraivali Rice Dosa recipe, Banyard Millet Crepe, Millet dosa recipe, South Indian breakfast ideas, Millet Breakfast recipe, Healthy Breakfast ideas, Healthy millet recipes, Diabetic friendly recipes, Dosa varieties, Millet dosa using mixie, South Indian breakfast using millets, Health benefits of millets, Millet recipes
Read more ...

Wednesday, August 5, 2015

Mutton Kheema Biryani | Minced Meat Biryani | Mutton Kaima Biryani

Mutton Kheema Biryani | Minced Meat Biryani | Mutton Kaima Biryani is a simple biryani recipe compared to other non-veg  biryani recipes yet with full of flavours. I love all types of biryani but coming to keema biryani, I’ve the feeling of each & every grain of rice has got the real taste of mutton, all because the minced meat  with the flavouring masala has got infused in the biryani rice so well.

This biryani  happened to be our weekend lunch those years when my son didn’t like to eat mutton pieces. I used to make this biryani quite often to make him eat goat meat.  After a long time, I’m preparing this biryani and as usual, it turned out awesome.
Recipe for Mutton Kheema Biryani | Minced Meat Biryani | Mutton Kaima Biryani:

Cuisine : Indian
Category: Main Course
Cooking time : 30 Minutes
Serves – 3-4
Ingredients:
  •      Seeraga samba rice – 2 cups
  •      Minced Mutton/ Keema (boneless) – 300 gm
  •      Onion (Big) – 2 Nos (chopped lengthwise)
  •      Tomato – 2 Nos.(Medium)(chopped)
  •      Green chilli – 2 Nos.
  •      Fresh Curd – ½ cup
  •      Ginger, garlic paste – 2 tbs
  •      Chilli powder – 2 tsp
  •      Garam masala powder – 1 tsp
  •      Turmeric powder -1 tsp
  •      Coriander leaves (finely chopped) – ¼ cup
  •      Mint leaves (finely chopped) – ½ cup
  •      Salt to taste

For seasoning:
  • Bay leaf – 1 No.
  • Cinnamon – 1 inch piece
  • Kal paasi – 2 Nos
  • Cloves – 2 Nos
  • Cardamom  - 2 Nos.
  • Fennel seeds – 1 tbsp
  • Oil -3 tbs
  • Ghee – 1 tsp (optional) 
Method:
  1. Wash mutton keema well with water, squeeze out the keema & keep aside.
  2. Take a pressure cooker, pour the oil and wait till the oil gets heated. Add the items given under “seasoning” one by one and wait until all these splutter to get the aroma from the seasoning.
  3. Add onion and Green chilli (just break into 2 or 3) and sauté well until the onion becomes translucent. Then add the ginger garlic  paste and sauté till the raw smell of the masala goes off.
  4. Add finely chopped tomato and add some salt so that the tomato will get cooked easily and sauté till the tomato gets mashed well.
  5. Then add all the masala powders and sauté till the oil oozes  out from the masala. Next, add curd and sauté well until the mixture gets glossy appearance.
  6. Then  add the mutton keema , sauté well,  add half portion of coriander  & mint leaves.
  7. Add required salt  and  a cup of water, close the lid and wait for  4  whistles and switch off.
  8. In the mean time, wash the seeraga samba rice and leave it as such after draining the water. It is sufficient if we do this part before 10 minutes of making biryani.
  9. Now open the pressure cooker, measure the keema gravy, add water so that the gravy+water =4 cups for 2 cups of rice and keep it aside.
  10. Transfer the above measure of gravy & water to a pressure pan & bring it to boil. When it boils add rice along with the balance coriander, mint leaves and  needed salt. You can check for spice also at this stage and you can add if needed. Drizzle ghee on top, if using.
  11. Close the lid and wait for 1 whistle, then simmer the flame for 3 minutes. Open the cooker after releasing the pressure slowly. Then follow the same procedure as we have done for other Biryani Recipes.


Your hot, spicy, tasty  Mutton Kaima Biryani is ready to serve! I have served the mutton biryani with onion raita and Elumbu Thanni Kuzhambu J
Note:
Cooking time for mutton keema varies and you should decide the whistles allowed while cooking mutton.
You can prepare this biryani with basmati rice also.
  
Tags: Mutton kaima biryani recipe, Minced meat Biriyani recipe, how to make mutton keema biriyani at home, Mutton kaima biryani with seeraga samba rice, mutton biryani with jeera samba, jeera samba mutton keema  biryani recipe, seeraga chamba rice minced mutton biriyani, jeera chamba mutton biryani, boneless mutton biryani with seeraga samba rice, minced goat meat biryani, minced goat biryani with basmati rice, mutton biryani with raita and elumbu thanni kuzhambu, hotel style mutton kaima biriyani recipe, pressure cooker mutton kaima biryani recipe, minced meat biryani recipe, 
Read more ...